
TL;DR
A closet setup for audio works best by controlling reflections and echoes, not by soundproofing. Proper placement, materials, and ventilation are key for a quiet, professional sound in small spaces.
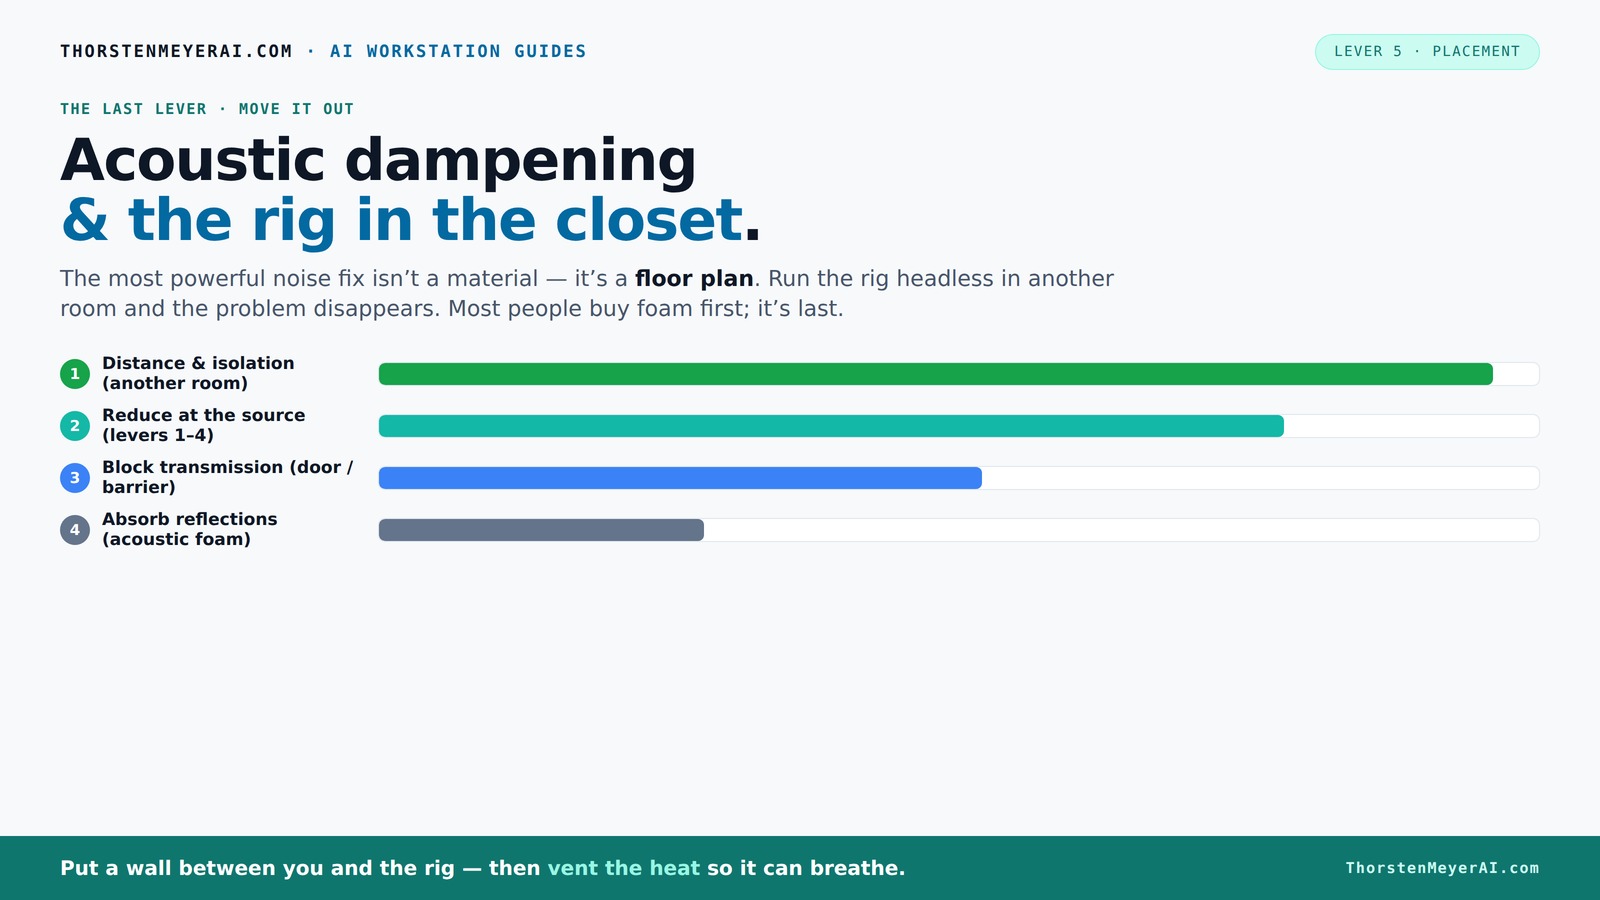
Acoustic dampening
& the rig in the closet.
The most powerful noise fix isn’t a material — it’s a floor plan. A rig you can’t hear because it’s in another room beats any amount of foam. Tap the approaches in Part 1 to see what actually works.
(another room)
(levers 1–4)
(door / barrier)
(acoustic foam)
Contain the noise, not the heat
Key Takeaways
- Prioritize placement — mic position and reflection points matter more than foam alone.
- Layer absorptive materials like foam, blankets, and bass traps for best small-space results.
- Seal gaps around doors and outlets to prevent sound leaks, not just add foam.
- Ensure proper ventilation to keep your rig cool without noise escalation.
- A closet can work as a vocal booth if treated thoughtfully—don’t expect total soundproofing, but control reflections effectively.

Focusound 52 Pack Acoustic Foam Panels 1" x 12" x 12" Sound Proof Foam Panles Soundproofing Noise Cancelling Wedge Panels for Home Office Recoding Studio with 300PCS Double-Side Adhesive
- Soundproofing Design: Triangular grooves for noise absorption
- Includes Adhesive Tape: 300pcs double-sided adhesive for easy installation
- Easy Shape Recovery: Reverts to shape after soaking in water
As an affiliate, we earn on qualifying purchases.
As an affiliate, we earn on qualifying purchases.
What’s the real difference between dampening and soundproofing?
Acoustic dampening is about softening echoes, not blocking noise from escaping. Soundproofing involves adding mass and sealing gaps to stop sound leaks. In a closet, foam and blankets absorb reflections, making vocals sound clearer. But they won’t stop your rig’s fan noise from escaping through gaps or cracks.
Understanding this distinction is crucial because it influences your approach and budget. Dampening is generally easier and more cost-effective, focusing on improving sound clarity within the space. Soundproofing, however, requires more extensive modifications, like adding drywall or specialized barriers, which can be costly and complex. Recognizing your primary goal—whether to improve recording quality or block outside noise—helps you choose the right strategy and avoid wasting resources on unnecessary measures.

Soundproofing Door Seal Kit - Door Frame Gasket, Screw On Weather Stripping for Doors - Top & Side Door Jamb Weatherstrip Set - Aluminum Exterior Door Seal - 84 x 36 (Aluminum, Medium-Duty)
- Acoustic and Draft Insulation: Blocks noise and drafts effectively
- Durable Aluminum Construction: Resistant to harsh weather and wear
- Easy Screw-On Installation: Quick and simple to install
As an affiliate, we earn on qualifying purchases.
As an affiliate, we earn on qualifying purchases.
Why placement beats treatment — and how to get it right
The biggest impact on sound quality comes from strategic placement of your microphone and rig. Proper positioning reduces harsh reflections, echoes, and room coloration that can color your recordings. For example, placing the mic too close to a wall can cause comb-filtering and boomy sounds, while positioning it at an optimal distance minimizes these issues.
Start by placing the mic at least 6 inches away from walls and angled slightly to avoid direct surface reflections that cause comb-filtering. Use a mirror to identify reflection points—if you can see a surface in the mirror from your recording position, it’s likely a reflection point that needs dampening. Moving your rig and mic away from these surfaces can significantly improve clarity without additional treatment.
For instance, if your mic is in a corner, you’ll get more bass buildup and echo. Moving it a few inches away from the corner and treating the reflection points—like the wall behind the mic—can instantly boost clarity. This approach emphasizes that placement often provides the most noticeable improvements before you invest in materials, saving you both time and money.

Portable Recording Booth for Home Studio, Soundproof Vocal Booth with Travel Bag for Voiceovers, Podcasts, Streaming and Music Recording
- Superior Sound Isolation: Absorbs up to 90% of noise
- Spacious One-Person Design: Fits creators up to 6.4 ft tall
- Quick Setup: Unfolds in 60 seconds
As an affiliate, we earn on qualifying purchases.
As an affiliate, we earn on qualifying purchases.
The best DIY materials for treating a tiny closet
In small spaces, layering absorptive materials is essential for effective acoustic treatment. Common DIY options include moving blankets, foam panels, rugs, and bass traps. Each material has a different role: blankets and rugs absorb mid and high frequencies, reducing flutter echoes and harshness, while bass traps in corners target low-frequency buildup that can muddy recordings.
For a layered approach, consider these practical steps: Cover the door with blankets or acoustic panels to prevent sound leaks, line the walls with foam panels at reflection points to absorb high frequencies, place rugs or mats on the floor to dampen bouncing sound, and add bass traps in corners to tame low-end resonance. Think of this process like building a sandwich—each layer contributes to a more controlled and balanced sound environment.
While commercial solutions exist, these DIY methods are affordable, customizable, and effective when implemented thoughtfully. The goal is to create a space where sound reflections are minimized, and the room’s natural acoustics are controlled to produce clearer, more professional recordings.

Sound Addicted - Studio Monitor Isolation Pads for 5 Inch Monitors, Pair of Two High Density Acoustic Foam which Fits Most Speaker Stands | SMPad 5
- Material: High-density acoustical foam (50kg/m^3)
- Dimensions: 7.5'' x 11'' x 1.6''
- Weight Capacity: Holds up to 24 lb per pad
As an affiliate, we earn on qualifying purchases.
As an affiliate, we earn on qualifying purchases.
How to seal gaps and block sound leaks effectively
Gaps around doors, outlets, seams, and other openings are the sneakiest sound leaks—small cracks can let in or escape significant amounts of noise. Sealing these leaks is one of the most cost-effective ways to improve both dampening and soundproofing. Sealing these leaks is one of the most cost-effective ways to improve both dampening and soundproofing. Use weatherstripping around the door frame to create a tight seal, acoustic sealant for cracks and seams, and draft stoppers at the bottom of the door. These tiny adjustments can dramatically reduce sound transmission.
For example, sealing the door gap with foam tape can cut noise leaks by over 50%, according to soundproofing experts. Additionally, adding a heavy curtain or blanket over the door can further absorb sound and prevent leaks. It’s important to remember that the aim isn’t total soundproofing—rather, reducing sound leaks enough so that your neighbors aren’t disturbed and your recordings stay clean. Effective sealing enhances the overall acoustic environment, making subsequent treatments more impactful and cost-efficient.
Ventilation: how to keep cool without noise ruining your setup
Putting a hot, noisy rig in a sealed closet without proper ventilation can lead to overheating, hardware throttling, and increased fan noise. To prevent this, you need to incorporate ventilation solutions that allow airflow without introducing noise. Passive vents can help, but active exhaust fans are more effective—they draw hot air out and bring in cooler, fresh air.
For example, a quiet 120mm fan drawing air through a vent can keep your rig at a stable 70°F even after hours of heavy load. Using ducting to direct hot air outside, or placing the closet near a window with a vented panel, ensures effective cooling. Proper airflow is critical because heat buildup causes your hardware to throttle performance and fans to spin faster, increasing noise levels. Achieving a balance between cooling and noise control maintains both hardware longevity and a quiet environment for recording or streaming.
Can a closet rig really work for vocals? Yes — if you treat it right
Yes, a closet can serve as a surprisingly effective vocal booth when properly treated. Its small volume creates a natural tight sound, and reflective surfaces can add brightness—if controlled. The key is strategic treatment: covering reflective surfaces with foam or blankets, sealing gaps to prevent sound leaks, and positioning the mic to minimize room coloration.
For example, a YouTuber converted a closet into a vocal booth by lining walls with foam, sealing the door with weatherstripping, and adding a thick blanket over the opening. The result was professional-quality vocals with clarity and warmth, proving that a small, well-treated space can rival dedicated booths. The critical factor is controlling the main reflection points and reducing standing waves, which cause muddiness and coloration. This approach demonstrates that with thoughtful treatment, a closet can become a high-quality vocal environment without the expense of a professional booth.
Do I need bass traps in a tiny closet? Absolutely, yes
Bass buildup is a common issue in small, parallel-walled spaces, leading to muddy, boomy sound that obscures clarity. Bass traps are specialized panels that absorb these low frequencies, preventing resonance and standing waves. In a closet, placing bass traps in corners—where low frequencies tend to concentrate—is especially effective.
For example, adding a couple of dense foam bass traps in the closet’s corners can reduce low-end muddiness by up to 30%, according to acoustic testing. Without bass traps, vocals and instruments sound muddy and indistinct, making mixing or AI inference less accurate. Investing in bass traps ensures your recordings are tight, controlled, and accurate, which is crucial for professional-quality audio or precise AI processing. They are a vital component in small, reflective spaces where low-frequency issues are most pronounced.
How thick should your panels or foam be? The sweet spot for closet treatment
Most effective acoustic panels for small spaces are between 2-4 inches thick. Thicker panels absorb more low frequencies and reduce echoes more effectively, especially in confined environments like closets. For a typical home studio or AI rig setup, 3-inch foam panels strike a good balance between absorption and ease of installation.
For example, a 3-inch foam panel can absorb frequencies down to around 80Hz, significantly improving vocal clarity and reducing muddiness. Thinner panels (1-2 inches) primarily target mid and high frequencies, which are easier to control but less effective at taming low-end issues. Combining panel thickness with strategic placement—especially at reflection points—maximizes their effectiveness and creates a more neutral sound environment.
Should you mix blankets and foam? Yes — layering is your friend
Combining blankets and foam creates a layered, more effective acoustic environment. Foam panels are excellent at absorbing mid and high frequencies, reducing flutter echoes and harshness, while blankets add damping to low-end frequencies and help seal sound leaks. For example, hanging a thick blanket over the door while lining walls with foam panels can significantly improve sound control.
This layering approach maximizes the strengths of each material, turning a basic closet into a studio-quality space. Think of it like layering flavors in cooking: more layers mean a richer, more balanced sound. The tradeoff is a bit more effort and aesthetic compromise, but the result is a more controlled, professional-sounding environment that’s tailored to your specific needs.
Prevent low-end muddiness and boxy vocals—what really works
Low-end muddiness is often caused by parallel walls and corners trapping bass frequencies, creating resonance that muddies recordings. To combat this, add bass traps in the corners to absorb these low frequencies, and consider angling panels or moving the mic slightly away from reflective surfaces to reduce standing waves. Using a combination of corner traps and strategic placement can significantly improve clarity.
For example, angling your desk slightly away from the wall, combined with installing bass traps, can reduce low-frequency resonance by up to 40%, resulting in tighter vocals and cleaner sound. It’s a tradeoff between space and sound quality—more treatment means better control over problematic frequencies, but it requires planning and some effort. The payoff is a more accurate, professional sound that’s free of boomy, muddy coloration.
How much soundproofing can a closet actually give you?
In reality, a closet’s soundproofing capabilities are limited. While it’s excellent for controlling internal reflections and echo, it won’t block loud external noise or prevent sound from leaking out entirely. Sealing gaps around the door and adding mass—such as drywall or acoustic panels—can improve sound isolation, but these measures have diminishing returns in small spaces.
For example, sealing the door and adding a layer of drywall or mass-loaded vinyl can reduce noise transfer by about 20-30%. However, achieving complete soundproofing in a small closet is impractical without extensive modifications or constructing a dedicated soundproof room. The key is to set realistic expectations: a treated closet will significantly improve sound clarity and reduce noise pollution but won’t eliminate all external sound. It’s a compromise between convenience and isolation, and understanding this helps in planning your setup effectively.
Frequently Asked Questions
What is the main difference between acoustic dampening and soundproofing?
Acoustic dampening reduces echo and reflections inside a space, making it sound better. Soundproofing blocks sound from passing through walls or doors, preventing leaks. In a closet, dampening is easier and more practical than full soundproofing.Can a closet really serve as a vocal booth?
Yes, if you treat it with foam, seal gaps, and add bass traps. Small spaces naturally create a tight, focused sound. Proper placement and material layering turn a closet into a surprisingly effective vocal environment.Where should I place acoustic panels or foam?
Focus on reflection points: behind the mic, ceiling above, and the door. Use a mirror to find these spots. Covering these areas reduces harsh room echoes and improves clarity.Do I need bass traps in a small closet?
Absolutely. Bass buildup causes muddy, boomy sound. Corner bass traps absorb these low frequencies, keeping your recordings tight and clear.How much noise reduction can I expect from a closet setup?
A treated closet mainly reduces reflections and echo, not full soundproofing. Sealing gaps and adding mass can reduce leaks by about 20-30%, but for complete silence, a dedicated soundproof room is best.Conclusion
Mastering acoustic dampening isn’t about turning a closet into a soundproof vault. It’s about smart placement, layering materials, and sealing leaks. With the right approach, your tiny space can deliver studio-quality sound—without the noise pollution.
Think of your closet as a blank canvas. With a few strategic brushes—foam, blankets, and sealing—you paint a clear, controlled soundscape. Your voice, your AI, your music—all come through crisp, clean, and focused.